E-commerce site x social media part 5
Today is the final chapter of the social plugin.
How to add mixi check buttons to EC-CUBE product pages
We will introduce you to the following.
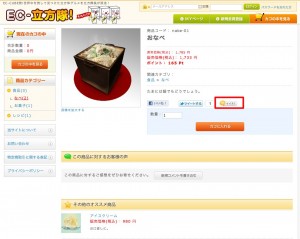
First, please take a look at the diagram below.
In the previous article, we were able to create Facebook and Twitter buttons simply by copying the code, but the mixi check button is a bit more difficult.
This is because mixi will not work unless you obtain an identification key. In order to obtain an identification key, you will need to register as a developer on mixi.
- Developer Registration
first,HerePlease register as a developer from here. Fill in the required information below.
![[mixi] Developer registration_change [mixi] Developer登録_変更](http://ec-marketing.info/wp-content/uploads/2011/05/59c153e7ffe8fd4f570257d93175eabf-300x225.jpg) *Linked to the mixi account you logged in with.
*Linked to the mixi account you logged in with.
- Issuing a check key
mixi Developer DashboardAccess the website and click "mixi Plugin" from the top menu and "Add New Service" from the left menu.
![[mixi] List of registered services | mixi check [mixi] 登録サービス一覧 | mixiチェック](http://ec-marketing.info/wp-content/uploads/2011/05/60ac4b9f0d031e6d5794a6bf88faaa37-300x122.jpg)
After agreeing to the terms of use, fill in the required information.
![[mixi] New service added | mixi check [mixi] 新規サービス追加 | mixiチェック](http://ec-marketing.info/wp-content/uploads/2011/05/59c478a8ded1bec90bd733ac6ea3a37b-260x300.jpg)
Check the details and click "Create".![[mixi] New service added | mixi check-1 [mixi] 新規サービス追加 | mixiチェック-1](http://ec-marketing.info/wp-content/uploads/2011/05/10ef64532778f54bc9f607709c09bfa2-300x210.jpg) Once registration is complete, click here to receive your identification key.
Once registration is complete, click here to receive your identification key.![[mixi] New service added | mixi check-2 [mixi] 新規サービス追加 | mixiチェック-2](http://ec-marketing.info/wp-content/uploads/2011/05/8488a41f5831c31492b3ae56298396c1-300x163.jpg)
- Mixi Check Button Customization
Enter the domain of the EC site as the target URL. Uncheck the profile image display as it will disrupt the layout. Finally, press the Get Tag button and the tag will appear as shown below.
![[mixi] EC-CUBE Test | Registration Service Details | mixi Check [mixi] EC-CUBEテスト | 登録サービス詳細 | mixiチェック](http://ec-marketing.info/wp-content/uploads/2011/05/457ab98fbcd800f426a8b1bd64ad295f-300x270.jpg)
It is important to note that you must set a target URL for each product detail page. Also, as always, copying the code below will work.
<iframe scrolling=”no” frameborder=”0″ allowTransparency=”true” style=”overflow:hidden; border:0; width:120px; height:20px” src=”http://plugins.mixi.jp/favorite.pl?href=http%3A%2F%2F◯◯◯.◯◯&service_key=△△△&show_faces=false&width=120″>
◯◯◯.◯◯The domain of the EC site△△△Please enter the identification key.
This completes the process of issuing the mixi check button.
Editing EC-CUBE product pages
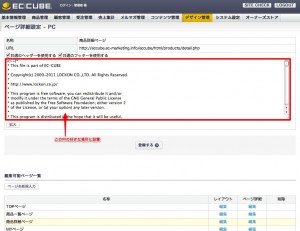
Finally, we will introduce how to install EC-CUBE, starting with the management screen of Ver2.11.1.
Design Management > PC > Page Detail Settings > Product Details Page > Edit
If you follow the steps above, you will arrive at the page shown below, where you need to paste the code above into the appropriate place.
The part I wrote is just below the Twitter button on line 179.
This completes the installation of plugins for the three major social media platforms in Japan: Facebook, Twitter, and mixi.
From next time onwards, I would like to delve deeper into e-commerce sites and social media.

